In this example we will create a simple traffic light system with a micro:bit. This is fairly simple and at a basic level involves switching red, amber and green LEDs on and off at certain time intervals.
We will have blocks, JavaScript, python and an Arduino code example.
Schematic/Layout
I used a little traffic light board which contained all 3 of the LEDs on a module which made it easy to connect to my micro:bit
This is the board that I purchased for anyone interested. It saves a lot of messing about with breadboards, these are low cost.
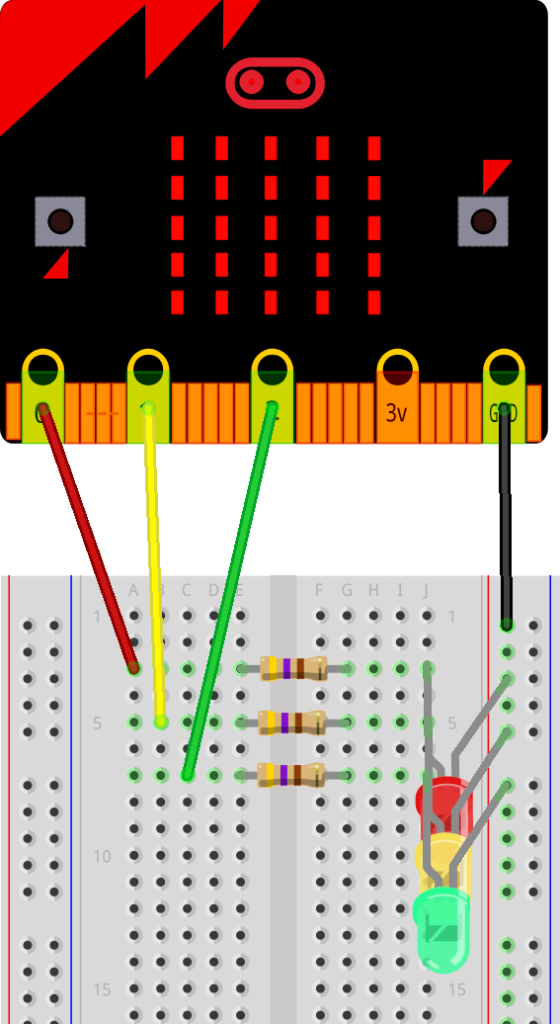
If you were to use a micro:bit, LEDs and resistors you need to create something like this
Traffic lights parts list
This is a list of parts exported from the fritzing layout above
Assembly List
| Label | Part Type | Properties |
|---|---|---|
| LED1 | Red (633nm) LED | leg yes; package 5 mm [THT]; color Red (633nm) |
| LED2 | Yellow (595nm) LED | leg yes; package 5 mm [THT]; color Yellow (595nm) |
| LED3 | Green (570nm) LED | leg yes; package 5 mm [THT]; color Green (570nm) |
| R1 | BBC MicroBit | variant variant 2 |
| R2 | 470Ω Resistor | package THT; resistance 470Ω; pin spacing 400 mil; tolerance ±5%; bands 4 |
| R3 | 470Ω Resistor | package THT; resistance 470Ω; pin spacing 400 mil; tolerance ±5%; bands 4 |
| R4 | 470Ω Resistor | package THT; resistance 470Ω; pin spacing 400 mil; tolerance ±5%; bands 4 |
Shopping List
If you buy all the parts separate I have supplied some links to sources – you can buy a pack of LEDs with different colours.
| Amount | Part Type | Properties |
|---|---|---|
| 1 | Red (633nm) LED | 3mm and 5mm Assorted Clear LED Light Emitting Diodes 5 Colors Pack of 300 |
| 1 | Yellow (595nm) LED | 3mm and 5mm Assorted Clear LED Light Emitting Diodes 5 Colors Pack of 300 |
| 1 | Green (570nm) LED | 3mm and 5mm Assorted Clear LED Light Emitting Diodes 5 Colors Pack of 300 |
| 1 | BBC MicroBit | BBC micro:bit bulk micro-controller with motion detection, compass, LED display and Bluetooth |
| 3 | 470Ω Resistor | 100pcs 1/4W 5% Carbon Film Resistor 330 360 390 430 470 ohm |
Code Examples
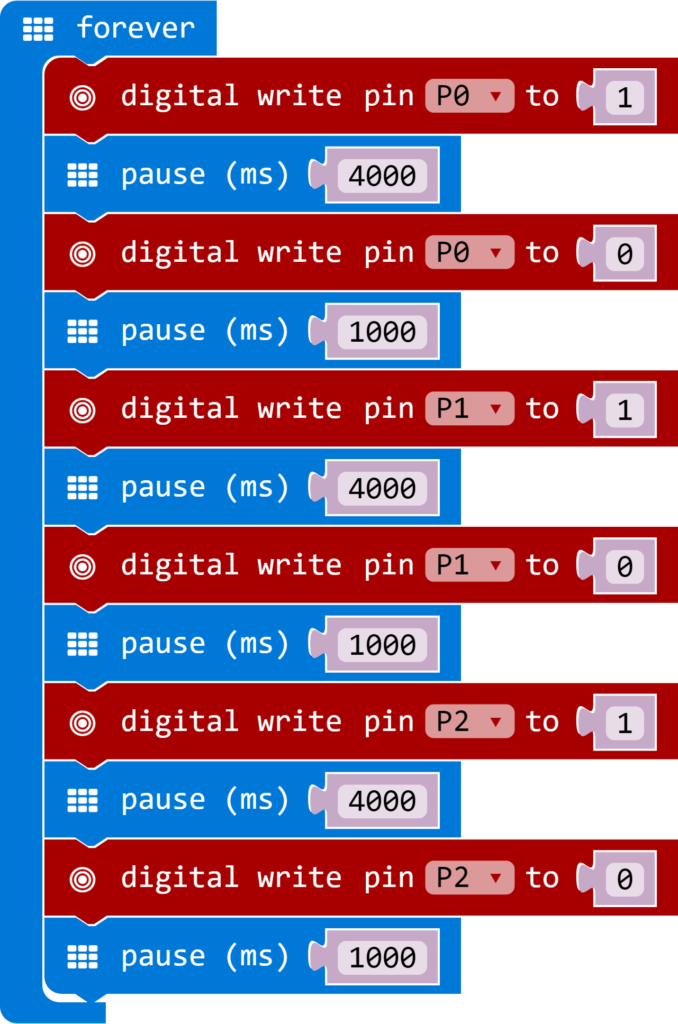
First of all we use blocks.
We will use digital write blocks and set the pins to either 0 or 1.
0 will switch a common cathode LED off and 1 will switch it on.
You need to try and create something like this
Javascript Example
Now for the JavaScript code for the example above
Download the hex file and copy it to your micro:bit and watch the traffic light effect on the LEDs
[codesyntax lang=”javascript”]
basic.forever(() => {

    pins.digitalWritePin(DigitalPin.P0, 1)

    basic.pause(4000)

    pins.digitalWritePin(DigitalPin.P0, 0)

    basic.pause(1000)

    pins.digitalWritePin(DigitalPin.P1, 1)

    basic.pause(4000)

    pins.digitalWritePin(DigitalPin.P1, 0)

    basic.pause(1000)

    pins.digitalWritePin(DigitalPin.P2, 1)

    basic.pause(4000)

    pins.digitalWritePin(DigitalPin.P2, 0)

    basic.pause(1000)

})
[/codesyntax]
Python example
We can also do the same in python, I used the online python editor at https://python.microbit.org/v/1.1
Type in the following and then download the hex file to your micro:bit and you should a traffic light sequence
[codesyntax lang=”python”]
from microbit import *

red_pin = pin0    # giving the LED pins names by using variables
amber_pin = pin1  # makes it easier to see how the program works
green_pin = pin2

while True:
    # red - turn amber LED off and red LED on
    amber_pin.write_digital(0)
    red_pin.write_digital(1)
    sleep(4000) # delay 4 seconds
    # amber - turn red LED off and amber LED on
    red_pin.write_digital(0)
    amber_pin.write_digital(1)
    sleep(1000)
    # green - turn amber LED off and green LED on
    amber_pin.write_digital(0)
    green_pin.write_digital(1)
    sleep(4000)
    # amber - turn green LED off and amber LED on
    green_pin.write_digital(0)
    amber_pin.write_digital(1)
    sleep(1000)
[/codesyntax]
Arduino Example
If you have your Arduino IDE setup so that you can use it to develop and program your micro:bit then here is an example for you.
Again fairly straightforward
[codesyntax lang=”cpp”]
const int redPin = 0;
const int amberPin = 1;
const int greenPin = 2;

void setup()
{
  pinMode(redPin, OUTPUT);
  pinMode(amberPin, OUTPUT);
  pinMode(greenPin, OUTPUT);
}

void loop()
{

    digitalWrite(amberPin, LOW);
    digitalWrite(redPin, HIGH);
    delay(4000);

    digitalWrite(redPin, LOW);
    digitalWrite(amberPin, HIGH);
    delay(1000);

    digitalWrite(amberPin, LOW);
    digitalWrite(greenPin, HIGH);
    delay(4000);

    digitalWrite(greenPin, LOW);
    digitalWrite(amberPin, HIGH);
    delay(1000);
}
[/codesyntax]
There we have it a simple traffic light example for the micro:bit – just choose your preferred development tool and go for it


